Categories
Robits!

Shark Hull Water Testing

The shark hull just passed a 48 hours float test. There was no change in weight or other signs it absorbed water. Using the bathtub enabled float testing in clean water – and this hull is huge so the bathtub was the only volume in which it would fit. That said – it turns out explaining why there is a robot floating in the bathtub can lead to unexpectedly awkward conversation.

Water Testing the Shark Hull

The new hull uses a blown polyurethane hull filler, which cast under pressure. That creates a closed cell foam but one dense enough for the hulls littoral pressure ratings. Tests show clear for moving on the rest of the design. 

Categories
Projects Robits!

Ray inspired hull prototype

I needed to go make a bunch of tests of different techniques for epoxy cast hull construction. Rather than just test putting hatches and portholes in a bunch of simple hollow geometric shapes, I decided to go ahead and run them on a simpler and smaller hull design. Since I really liked the Manta Ray robots – I used the shape of one of those for inspiration.

Here you can see my first pass. It may look a little funny as I am designing the wings to bolt onto the frame, and they are missing in these renderings.

Shol_P1

I am using this design to test the casting of an epoxy hull, using the BlueRobotics portholes, and different designs for a 3D printed seat for a pressure rated hatch. I may have been guilty of over engineering on my first design, since once I started digging into it I think I may be able to accomplish most of my design goals with this smaller design.

I am testing using an external tank with this design, but down graded the tanks size since the hull will be much smaller. I don’t have the printed hatch seat shown in this design though.

Shol_P2

Heading into the holidays. Either I’m going to make a lot of progress on this project – or none. It all depends on what we pick for the holiday hack-a-thon.

Categories
Projects Robits!

Scratch that hatch

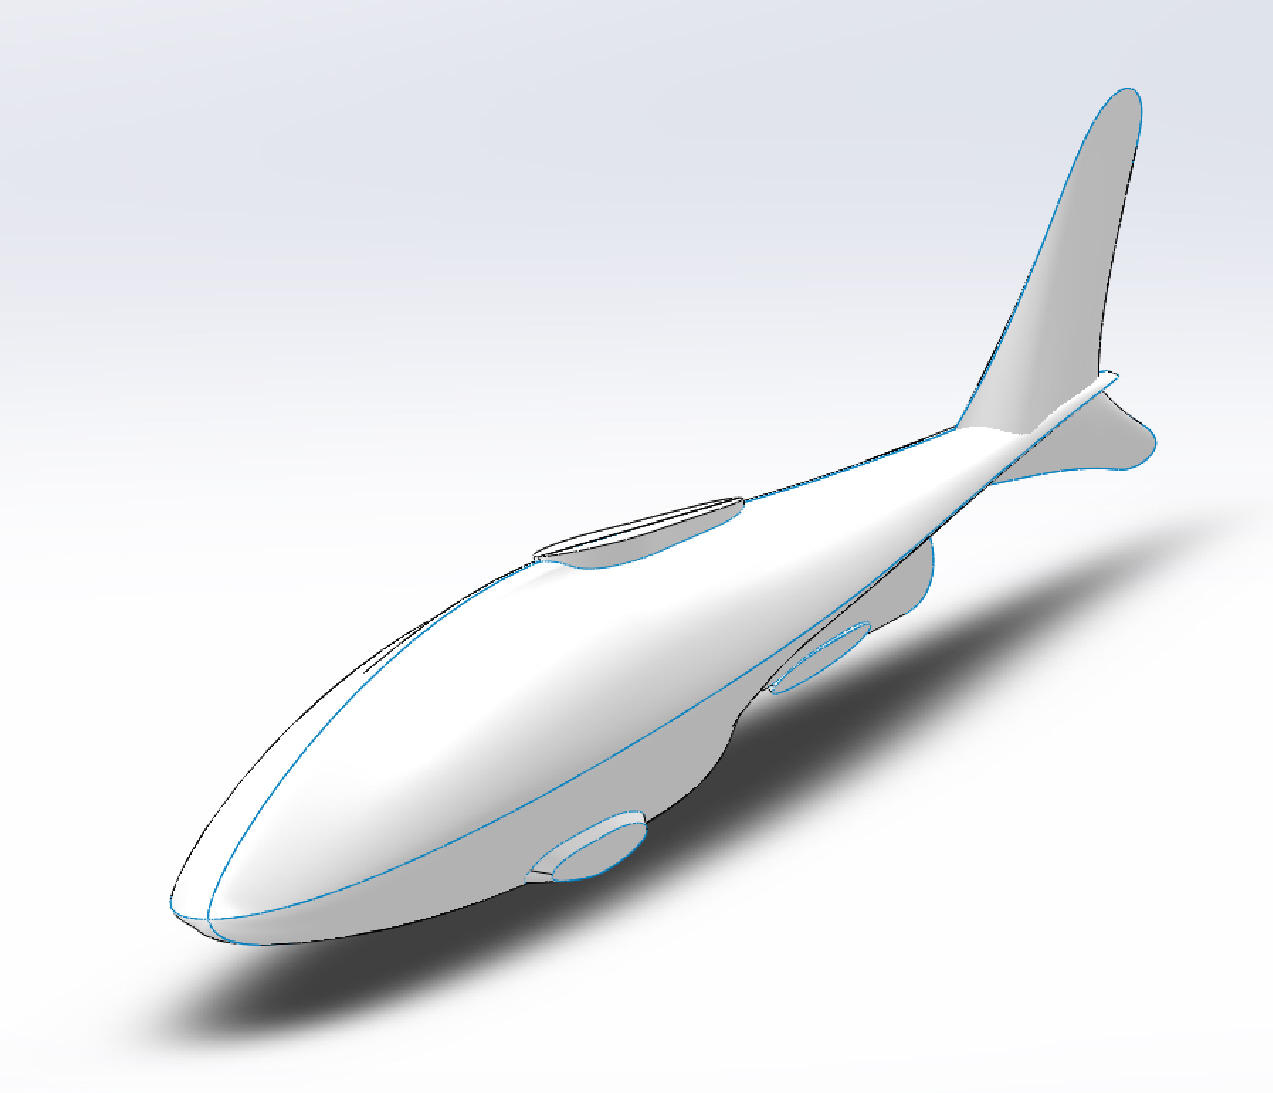
I am building my AUV to be a configurable platform on which to try out a bunch of ideas, so I am going to need some sort of hatch through which I can assemble, repair, and modify the internal components.

My first thoughts were to make a sort of beveled seat you can see here. The beveled seat in the hull mates to a complimentarily beveled plug piece. You have a rubber layer between the two pieces, and the more water pressure there is on the plug the tighter the seal.

Modor_BigBelly_NoTail_Printable_V4

Unfortunately after talking this design over with some friends who has a lot of experience deploying things deep in the ocean, I decided not to use the wedge hatch. Apparently at depth even slight deformations of the hull can corrupt the seat seal, and the hatch will sweat water into the pressure chamber. My maximum target depth for this is only 250 feet, but I would like the design to be able to stay submerged for very long periods – so a sweating seal is a problem.

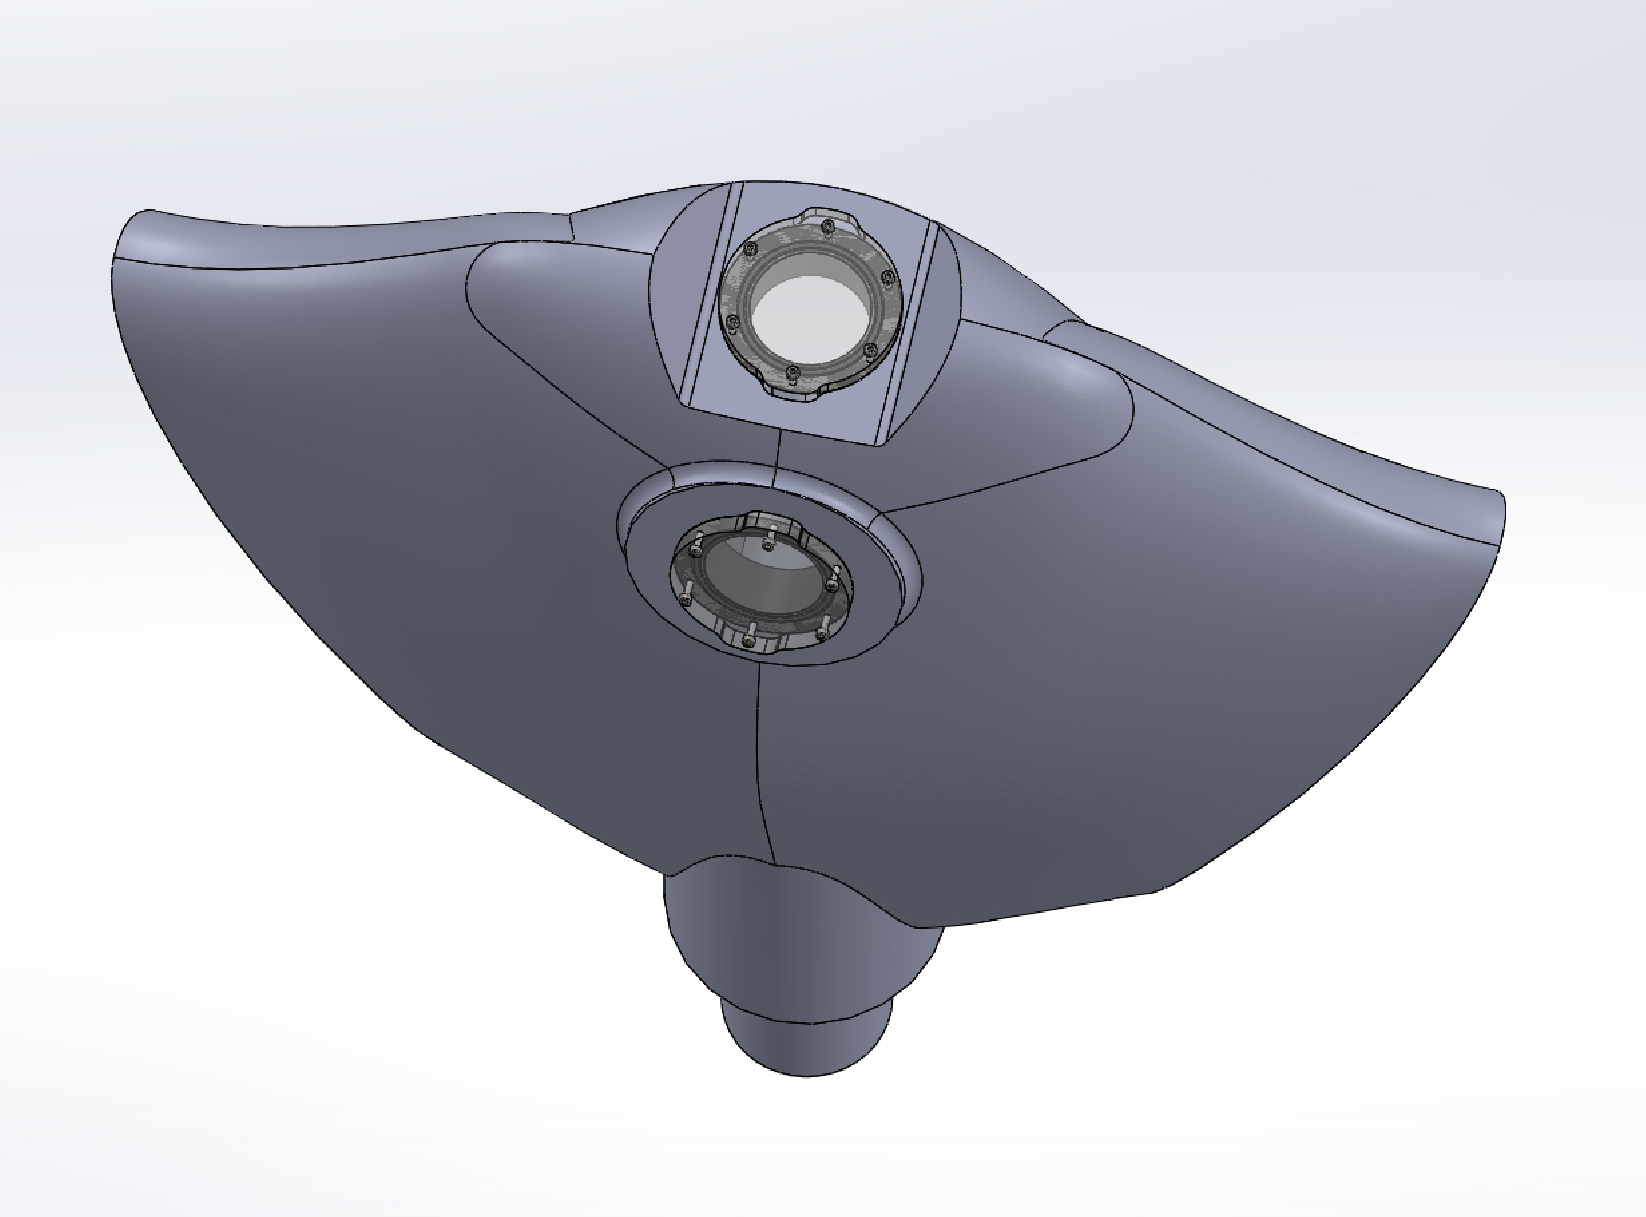
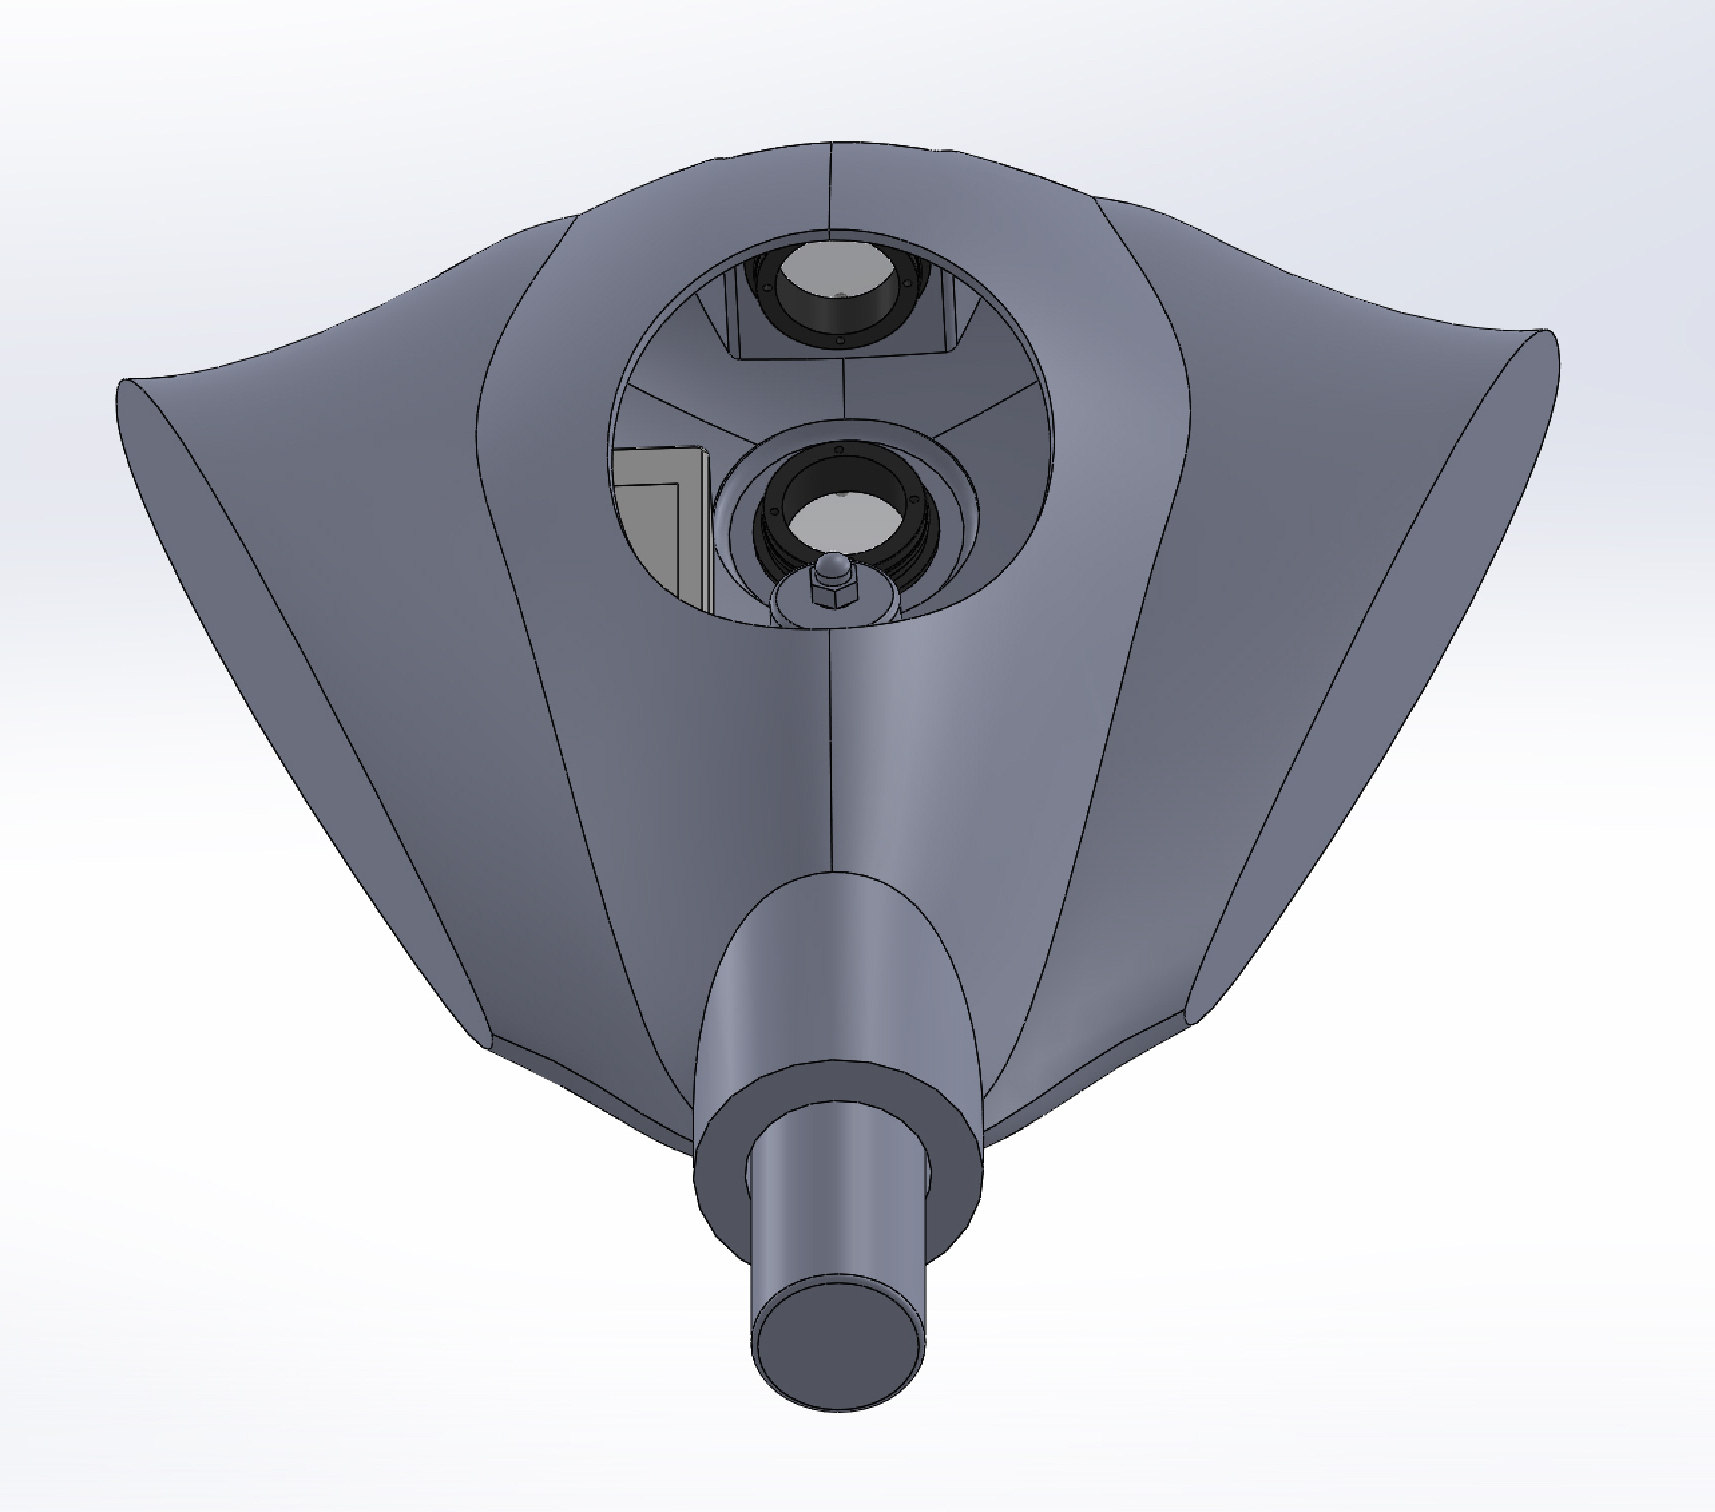
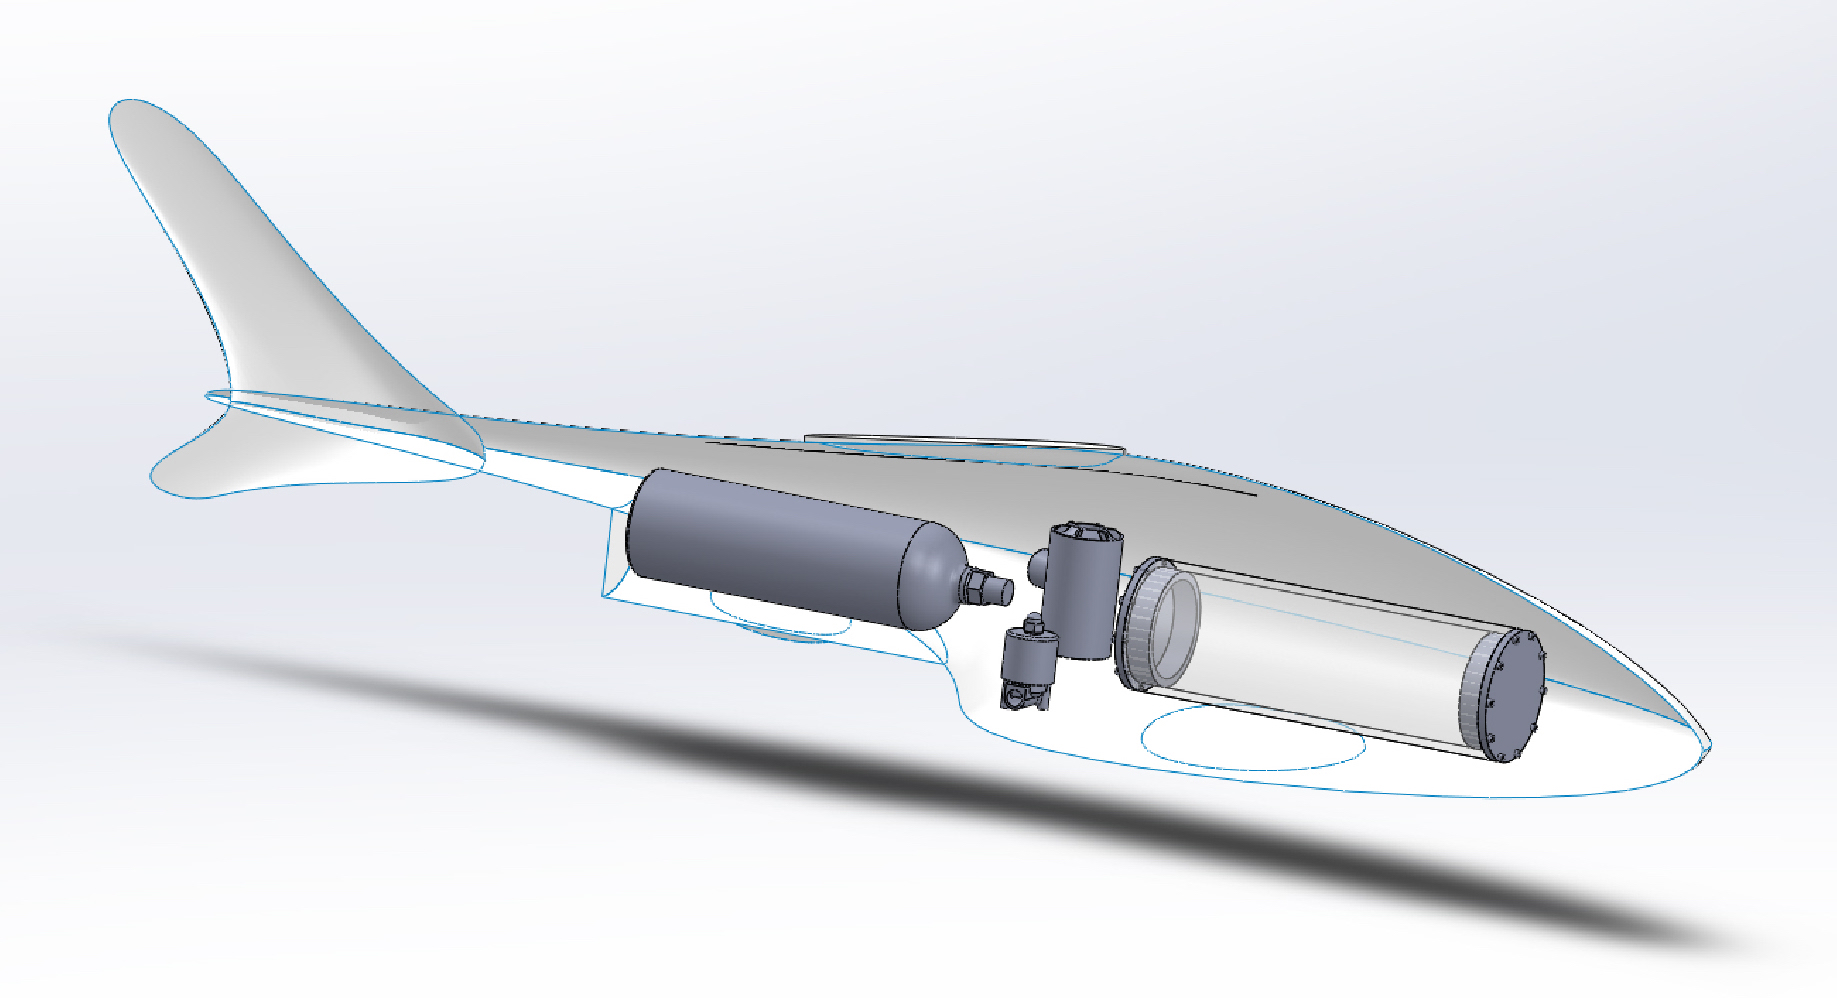
Right now the leading contender is using the pressure rated caps Blue Robotics sells for their watertight enclosures. Here you can see a hull design where a 6-inch plug has been added towards the nose. The tank you can see is a 24 Oz CO2 tank and pressure regulator. I’m checking that I can install the tank and regulator through the hatch.

Modor_Bigbelly_Hatch_Assem

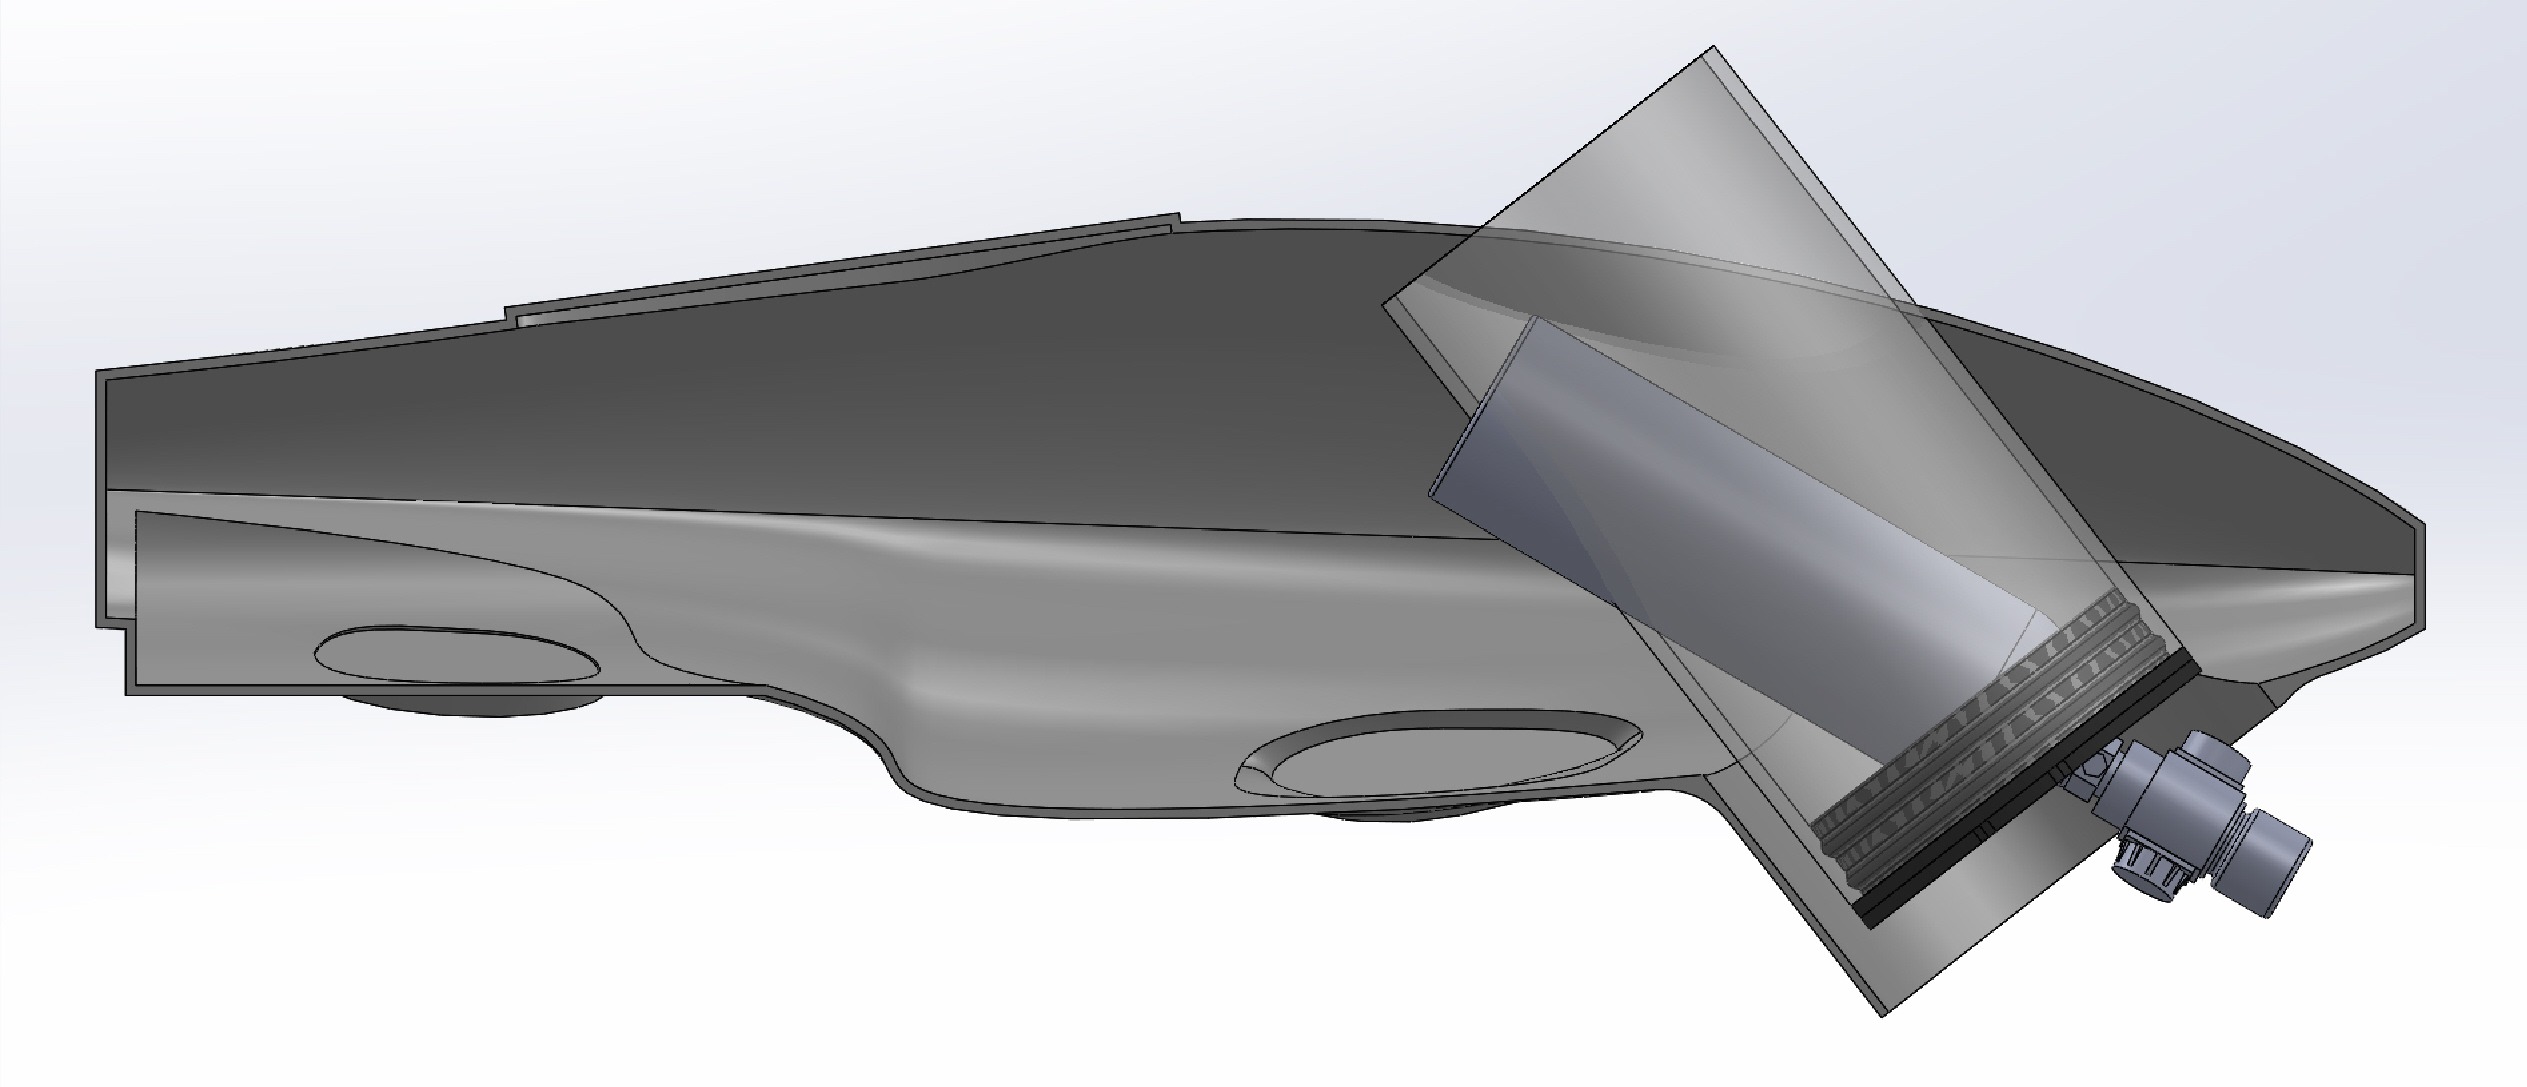
I have not found a hatch position that I like yet, but the one pictured is as close as I have come. Things get a lot easier if I switch the CO2 tank to be screwed on from outside the pressure hull, while keeping the pressure regulator contained in the hull, so that’s what I am likely to try next.

One nice part about using the Blue Robotics pressure flanges – is that they offer clear outer faces of an optical quality. So I can easily add internal cameras looking outward through the hatches. So if I can make this hatch style work, I will probably add several smaller ones for camera and sensor mount points.

Categories
Robits!

“Growing” robotic tubes!

I am experimenting with soft robotic actuators lately, and that has me reading papers and tracking what work people are publishing again. This has to be one of the coolest soft robotic ideas I have run across.

Information about this groups research is available here:
Robotic eversion actuators (growing tubes)

I highly recommend looking at their video. Ideas elegant in its simplicity. Arstechnica has a decent writeup of the tech, with a better description of how it actually works available here: Arstechnical Writeup

Categories
Projects Robits!

Hull of a day…

Whoop! I finally have a hull design. I found a STL model for the type of shark I wanted my design to mimic. The white you can see poking up behind the red shark is my hull design.

Modor_BigBelly_V8_picture1

The elliptically shaped flats on the hull are for mounting fins. This approach will let me push out the problems of fin design until later. I’m hip deep in problems as it is. I also like that it will let me repair the fins, try out multiple fin designs, and remove them for transport. I’m going to shop off the tail as well, but I am debating how to add control surfaces, so I left it intact for now.

Modor_BigBelly_V8

Here you see the outer surface of the hull. I am trying a cast acrylic hull design. The wall thickness will be just over an inch. So there is much less room inside the hull then it initially seems. Since things are going to be tight I modeled up the critical parts first so I could play with different layout designs and test fit.

Component_Layout_Assem

The ballast system is driven off of a 24oz CO2 tank, which you can see got pushed out into the tail. Electronics will be housed inside a 4inch pressure chamber. The weird grey cylinder is a bilge pump being repurposed for propulsion and steering. I am still figuring out where to put another pump, ballast tanks, ballast weights, batteries, and some other goodies.

I have a lot more work to do on this – but I am happy how it is shaping up.

Categories
Projects Robits!

Making watertight electrical connector

One of the problems the AUV project needs to solve it making electric connection through a pressurized hull. I found this interesting tutorial for making making watertight electrical connectors from pvc.

Categories
Projects Robits!

Settling in on a hull design

Initially I was drawn to Rays for a bio-inspired design. However, eventually I would like to use the active ballast to have the AUV be able to glide over large distances and Rays don’t really glide through the water in the right way.

So right now I am thinking I will use the general design of a small shark. After some quick measurements though I’m going to blow out its belly to be more like a grey whale. That should still give more storage and decent flow over the frame.

Bigbelly

I am toying about adding two smaller fins – if I am right it could help with glide stability – but man it does not look weird. I will probably ditch the two fins, but keep the long thin tail. Since I am going to be printing all the hull mold pieces in chunks on my 3d printer – I also am strongly incentivized to minimize hull surface area.

Bigbelly 2

Categories
Robits!

Cool tutorial on making pneumatic muscles

Interesting tutorial in making pneumatic muscles. (here)

Categories
Projects Robits!

Soft robotics manta-ray inspired UAV

The Softrobotics Toolkit Manta-Rae project is well documented project using soft robotics techniques to make an manta-ray inspired UAV.

Categories
Projects Robits!

Bio-Inspired Manta Ray Robots

Sketching up designs for the AUV frame I keep getting drawn towards doing a bio-inspired design. As part of that design arc I have started looking at what other people have done with bio-inspired underwater drones. Two of the inspirations I keep getting drawn back to are the whale shark and the manta ray. So I was really excited to find this. Researchers created a tiny manta-ray inspired swimming robot.

Posting it here so everyone on the project can see it, but even if you don’t look at any of the other AUV stuff this work is awesome and I highly recommend looking at it.

On a larger scale, back in 2012 the Bio-Inspired Engineering Research Laboratory (BIER Lab) (http://www.bartsmithlabs.com/index.html) put together an interesting ROV ray based robot.

This video is worth watching. It does have that TV show puffery, but it makes up for it. The video shows how they used x-rays of cartilage of the rays as inspiration. It also shows their mechanical actuator for driving the fins in more details.

This is probably my favorite stingray inspired robot. Not really bio-inspired, but its still kind of awesome.

Update: Dec 17, 2017 – Just ran across this german company Festo, which also put out a ray inspired robot. Link to it Here.