Categories
Projects Robits!

Settling in on a hull design

Initially I was drawn to Rays for a bio-inspired design. However, eventually I would like to use the active ballast to have the AUV be able to glide over large distances and Rays don’t really glide through the water in the right way.

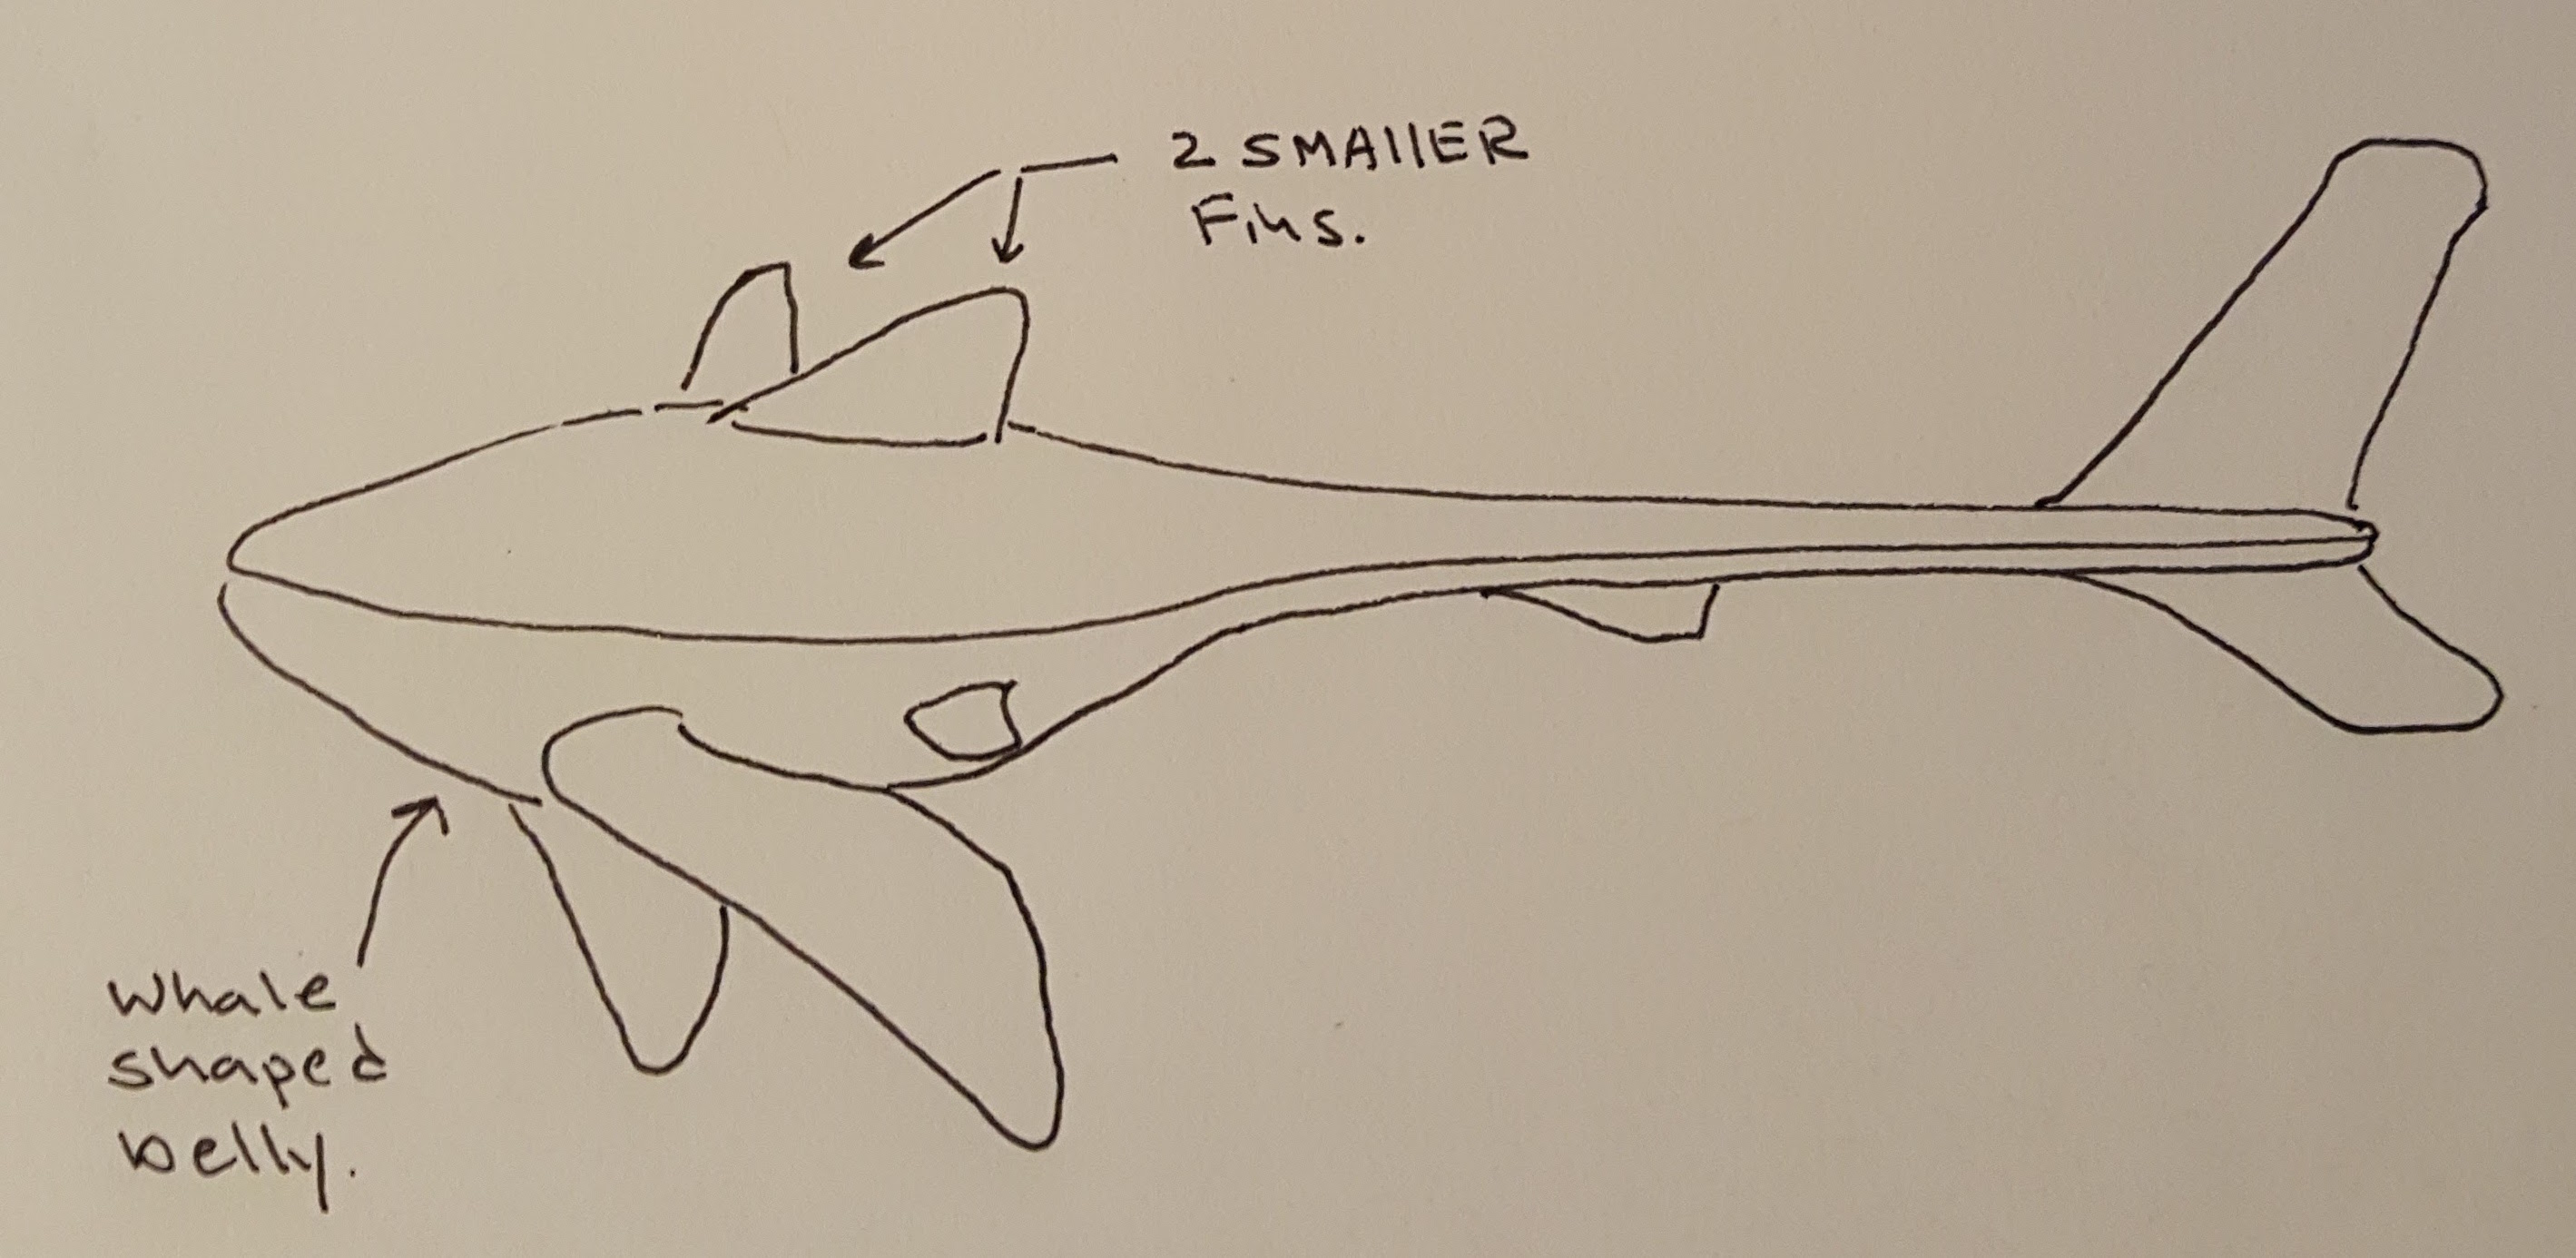
So right now I am thinking I will use the general design of a small shark. After some quick measurements though I’m going to blow out its belly to be more like a grey whale. That should still give more storage and decent flow over the frame.

Bigbelly

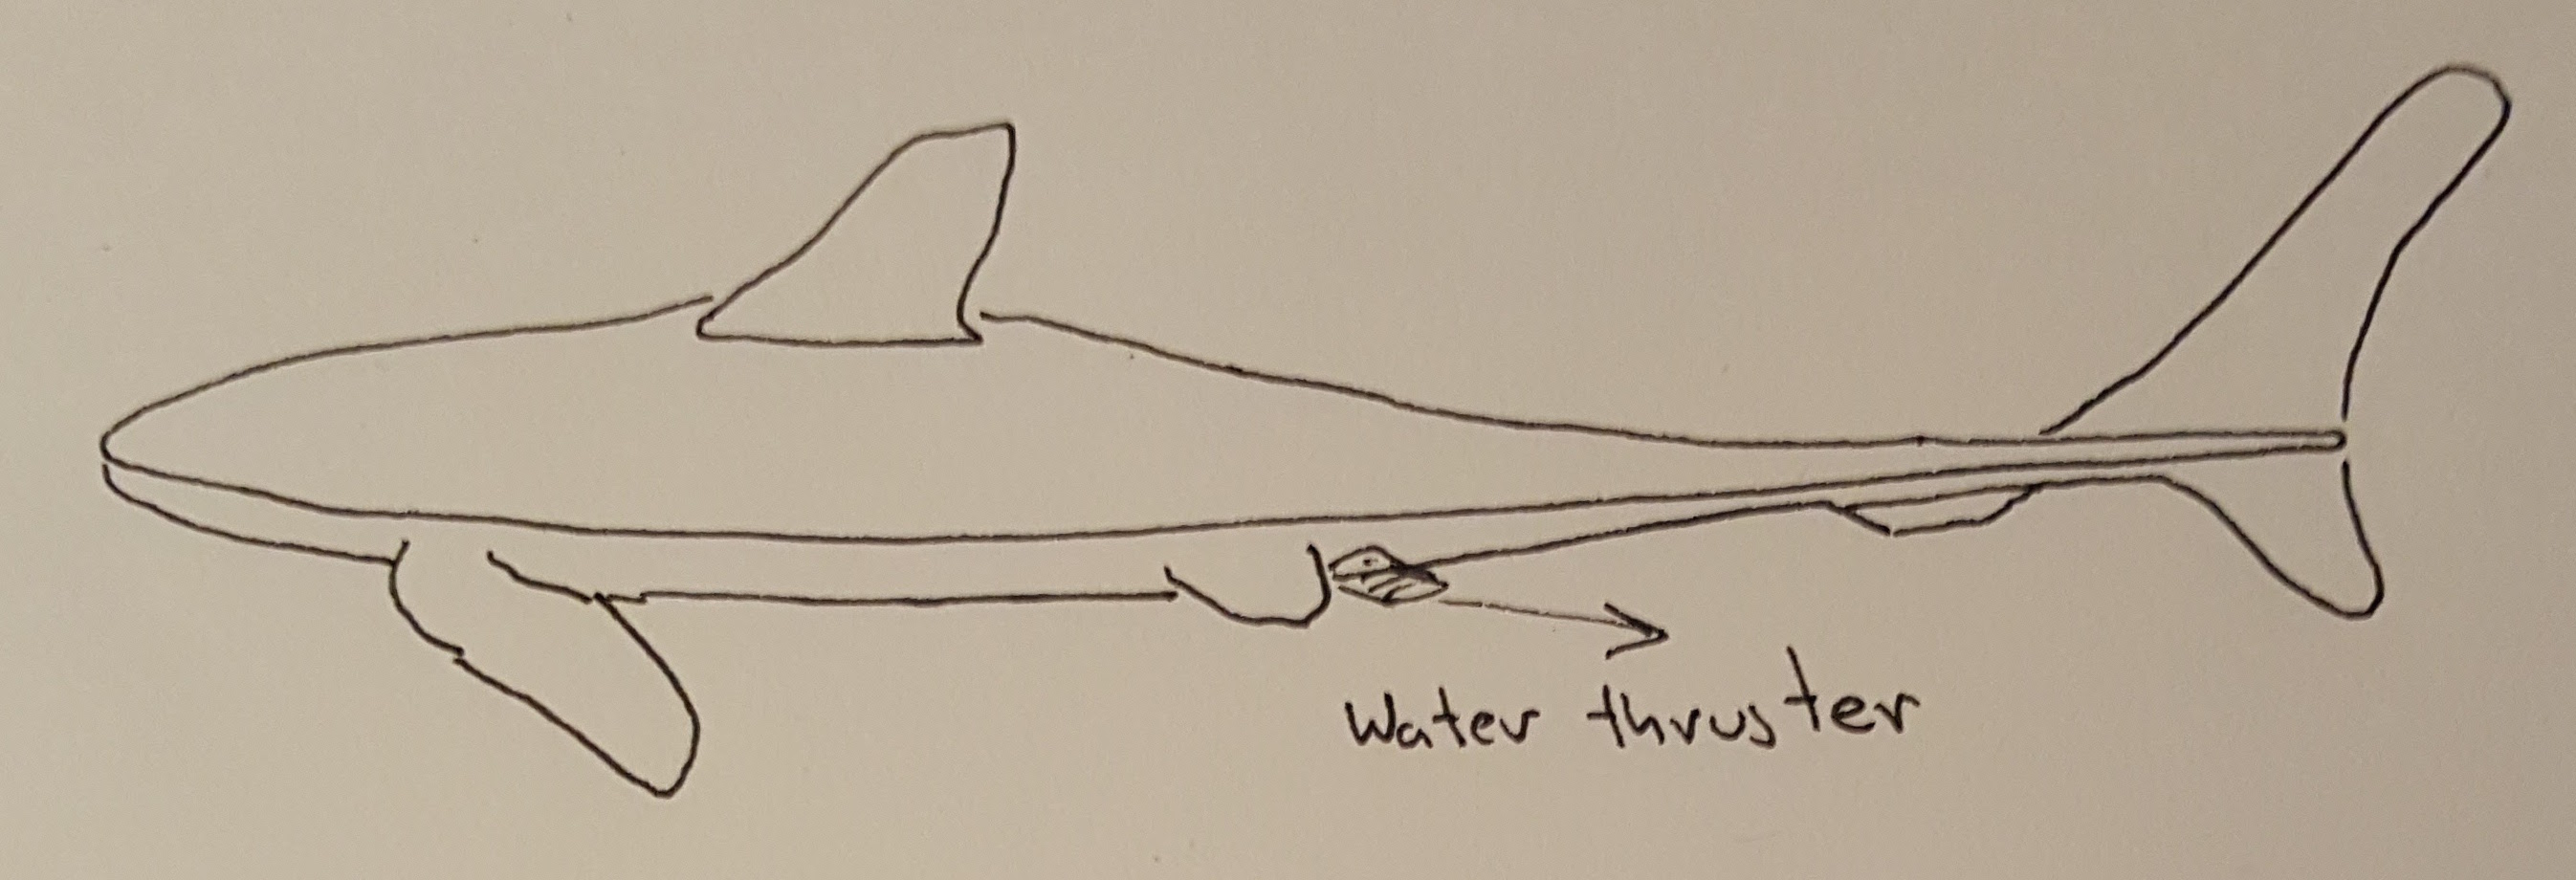
I am toying about adding two smaller fins – if I am right it could help with glide stability – but man it does not look weird. I will probably ditch the two fins, but keep the long thin tail. Since I am going to be printing all the hull mold pieces in chunks on my 3d printer – I also am strongly incentivized to minimize hull surface area.

Bigbelly 2

Categories
Robits!

Cool tutorial on making pneumatic muscles

Interesting tutorial in making pneumatic muscles. (here)

Categories
Projects Robits!

Soft robotics manta-ray inspired UAV

The Softrobotics Toolkit Manta-Rae project is well documented project using soft robotics techniques to make an manta-ray inspired UAV.

Categories
Projects Robits!

Bio-Inspired Manta Ray Robots

Sketching up designs for the AUV frame I keep getting drawn towards doing a bio-inspired design. As part of that design arc I have started looking at what other people have done with bio-inspired underwater drones. Two of the inspirations I keep getting drawn back to are the whale shark and the manta ray. So I was really excited to find this. Researchers created a tiny manta-ray inspired swimming robot.

Posting it here so everyone on the project can see it, but even if you don’t look at any of the other AUV stuff this work is awesome and I highly recommend looking at it.

On a larger scale, back in 2012 the Bio-Inspired Engineering Research Laboratory (BIER Lab) (http://www.bartsmithlabs.com/index.html) put together an interesting ROV ray based robot.

This video is worth watching. It does have that TV show puffery, but it makes up for it. The video shows how they used x-rays of cartilage of the rays as inspiration. It also shows their mechanical actuator for driving the fins in more details.

This is probably my favorite stingray inspired robot. Not really bio-inspired, but its still kind of awesome.

Update: Dec 17, 2017 – Just ran across this german company Festo, which also put out a ray inspired robot. Link to it Here.

Categories
Projects Robits!

Thoughts on Ballast Control

I have wanted projects to play with some of the newer machine learning algorithms for a while, so this year’s holiday hacking project is going to be an autonomous underwater drone (AUV). The plan is to start by designing the ballast system first, as it can be independently tested and as a module.

From what I understand Navy Subs use compressed air, charged during surface stops, to run their ballast systems. Water is driven out of the ballast chamber by opening valves on the bottom of the ballast tank while leaking high-pressure air into the chamber. Similarly water is let into the ballast chamber by opening the valves on both the bottom and the top of the ballast tank, letting air escape out the top while water enters through the valves at the bottom of the tank.

I am thinking of using a similar approach for the first version of the AUV. The main difference is that rather than compressed air, I am going to try using CO2. So something like this – where there are two solenoid valves for air and water venting to a ballast tank, and a third valve and regulator system for letting CO2 into the ballast tank.

ballast_tank

So to empty the ballast tank with this system you open the valve to the water, at the bottom of the tank, and then blast in CO2.

ballast_control

For the CO2 side of things version one will use a pressure regulator intended for hooking CO2 tanks to compressed air tools. They are relatively cheap 80-160PSI regulators. For plumbing I am going to use 1/4 inch NPT push to connect fittings and pressure line meant for breaks. The design adds an on off valve to the tank as a safety for when the AUV is being transported. Best guess is $140 for ballast control.

Categories
Martial Arts Woodworking

Böker Gnome Training Blade

While the glue was drying on the kitchen knife trainers I am making – I decided to make a trainer for the small knife I sometimes carry. It is a Böker Gnome. It is only 4 inches long in total, with a 2.125 inch blade length, so you can carry it anywhere – but it is a tiny knife.

boker_gnome_trainer_p2

Working with small knives is always different, as they tend to just disappear in your hand. The Gnome has that same property of being hard to see – yet its curving blade feels like an extension of your hand. It should be interesting to train with – especially to defend against.

Categories
Knifemaking Uncategorized Woodworking

Wooden Kitchen training Knives – (part one)

I’ve wanted a set of wooden kitchen knives for a while now. All the training blades I have ever run across were all patterned after crazy blades meant for poking holes in, or cutting, other people; basically large combat or hunting blades.

For knife work, I figure that if I ever have to defend myself form a knife attack, it is way more likely that my attacker will be using a weapon of opportunity than pulling out some crazy combat or hunting knife. Conversely, kitchen knives seem like a good pattern to practice basic knife attacks – as they are easily found most homes. So I am making a set of kitchen patterned training knives.

I started with some holly that I had harvested a few years ago.

kitchen_training_knife_p1

The piece of holly I started with was fairly thick – so after cutting out a knot
I planed the rough cut stock flat on both sides, cut the stock in half, and then planed it flat and to the desired thickness.

kitchen_training_knife_p3

From there I traced the pattern of the pattern of the knife in question onto the wood. I tried and pick a location and alignment with the grain that will work best for the knife pattern in question.

kitchen_training_knife_p5

The next step is gluing on the handle scales. Holly is a very white wood, so I am glueing on American cherry scales. I’m hoping after a few coats of linseed oil it will finish off nicely. The scales are taking forever to add since each side takes a day for the glue to dry.

Categories
Thing a Week Tools

Thing a Week No 1. The Crowbar Rack

It is that time again, time to spring clean the project list, and that means Thing a Week is back! To get started – this weeks project is a crowbar rack.

crowbar_rack_after

If you are wondering why you would need a crowbar rack – you have obviously never had a multi hour crowbar hunt with your visiting father looking for the right one. Ok, being serious – crowbars are weird. You only need them once or twice a year – but when you need one you really need one. Having one of the right size also usually makes the job in question significantly easier.

Dad’s not going to be visiting for a while, but I am moving my machine shop next weekend and figured I would want to know where my crowbars and cats paws were.

(If the “Thing a Week” idea sounds familiar – I blatantly ripped the idea off from
Jonathan Coulton a few years ago. Its an amazing tool. )

Categories
esp8266 Projects

Pythagorean Plotter, 4-day Hacking Session

When some of my friends come to town to visit we go see the sites, which is fun. Others though come to town and we spend the entire visit on a hacking session broken up with beer drinking and bad movies. My friend Phil’s is in town for such a visit – and we are doing a 4-day hacking session building a wall plotter. We are calling the plotter Wilbur.

The unique part of our wall plotter is we are building it around industrial suction cups. Our goal is to be able to sneak into a friend’s office, or up to a window, and suction cup the plotter onto the white board or window. The goal is a stealth graffiti system for pranks on friends.

In preparation for Phil hitting town I ordered up some RAM double suction cup mounts, and then CAD modeled up a case coupling the mechanical elements to the stepper motor mounts.

Wilbur_Ploter_Day1_Mechanical_P1

I split the design into two parts so that would bolt together, and to the underlying RAM mount. The electronics are fairly simple, and esp8266 to handle WiFi and computing, and another stepper driver board for handing the motor. Since we are using a counterweighted design all we need to be able to do is control the direction and stepping of each motor, as well as provide pen up / down commands. From those simple pieces we should be able to build a system with very complex output.

The required action shot. Phil soldering. Which reminds me – he’s actually coding while I write this, so I better get back to it.

Phil_Soldering_FallVisit_Day1

Categories
Projects Prototyping Smart Matter

Finishing the extruder mechanical assembly…

I love long weekends. The rest of the parts I ordered finally showed up Friday, and I was able to finish assembly of the main extruder body. Well “finish” is a bit of a stretch. I’m going to tear it down to machine some of the metal parts, and then re-assemble it – but I’m happy with the design expect to be able to start installing the electronics.

Its nice to see things finally shaped up the way I designed them in SolidWorks.

SmallBodelTableAssembly

IMG_20150905_235601

Its weird, you can make and test incredibly complicated designs in CAD, and these days 3D printers even let you hold versions of the parts as you design them, but most times it is not until I do the physical assembly of the first prototypes that I really feel a sense of accomplishment. There is feeling of transformation from virtual to the real that takes place somewhere during assembly, and it is a transformation that I have been unable to satisfactorily quantify or capture.

As an HCI researcher that elusiveness is a problem I have been chewing on, trying to figure out how to attack for a while now. We are about to see an explosion of virtual and augmented reality technologies release for public consumption – and it seems like understanding what drives that magic transformation will be critical. It is however, not the problem I am working on currently – so back to work.